
The Complete Beginner Guide to Auth: Basic Auth, Bearer Tokens, OAuth2, JWT and SSO
A clear starter guide to web authentication. Learn Basic Auth, sessions, bearer tokens, JWT, OAuth2, and SSO, when to use each one, and the trade offs that matter.

Think about the last time you logged into an app.
You tapped a button, typed your password, and within a second, the app said welcome.
That tiny moment feels simple, but behind it sits one very important problem.
How does the system know it is really you?
This question is at the heart of authentication. Every product you use relies on it.
Whether it is a bank app, a food delivery app, or a big social platform, they all need a secure way to confirm user identity.
If authentication fails, the entire system is at risk.
The challenge is that authentication has many flavors.
Some are simple. Some are more advanced.
Some work great for internal services. Others shine in user facing apps.
To help you understand, we will look at the most common authentication strategies, like Basic Auth, Bearer Auth, JWTs, OAuth2, and SSO, in this blog.
Let’s go through each and see how they work under the hood, and when you should actually use them.
1. HTTP Basic Authentication
HTTP Basic Authentication is the grandfather of web security.
It is defined in the very early specifications of the web.
It is simple, supported by virtually every system in existence.
However, it is also one of the most misunderstood mechanisms regarding security.
Let’s understand it with an example.
The Secret Password Example
Imagine a treehouse club with a guard at the door.
To get in, you have to whisper a secret password.
You walk up to the door.
Guard: “Halt! Who goes there?”
You: “It is me, Alice. The password is ‘blue-monkey’.”
Guard: “Enter.”
Five minutes later, you go out to get a snack and come back.
Guard: “Halt! Who goes there?”
You: “It is Alice. The password is ‘blue-monkey’.”
In Basic Auth, there is no concept of “logging in” and staying logged in.
You have to provide your username and password with every single request you make to the server.
If your app loads ten images, three scripts, and a data file, your browser sends your password fourteen times.
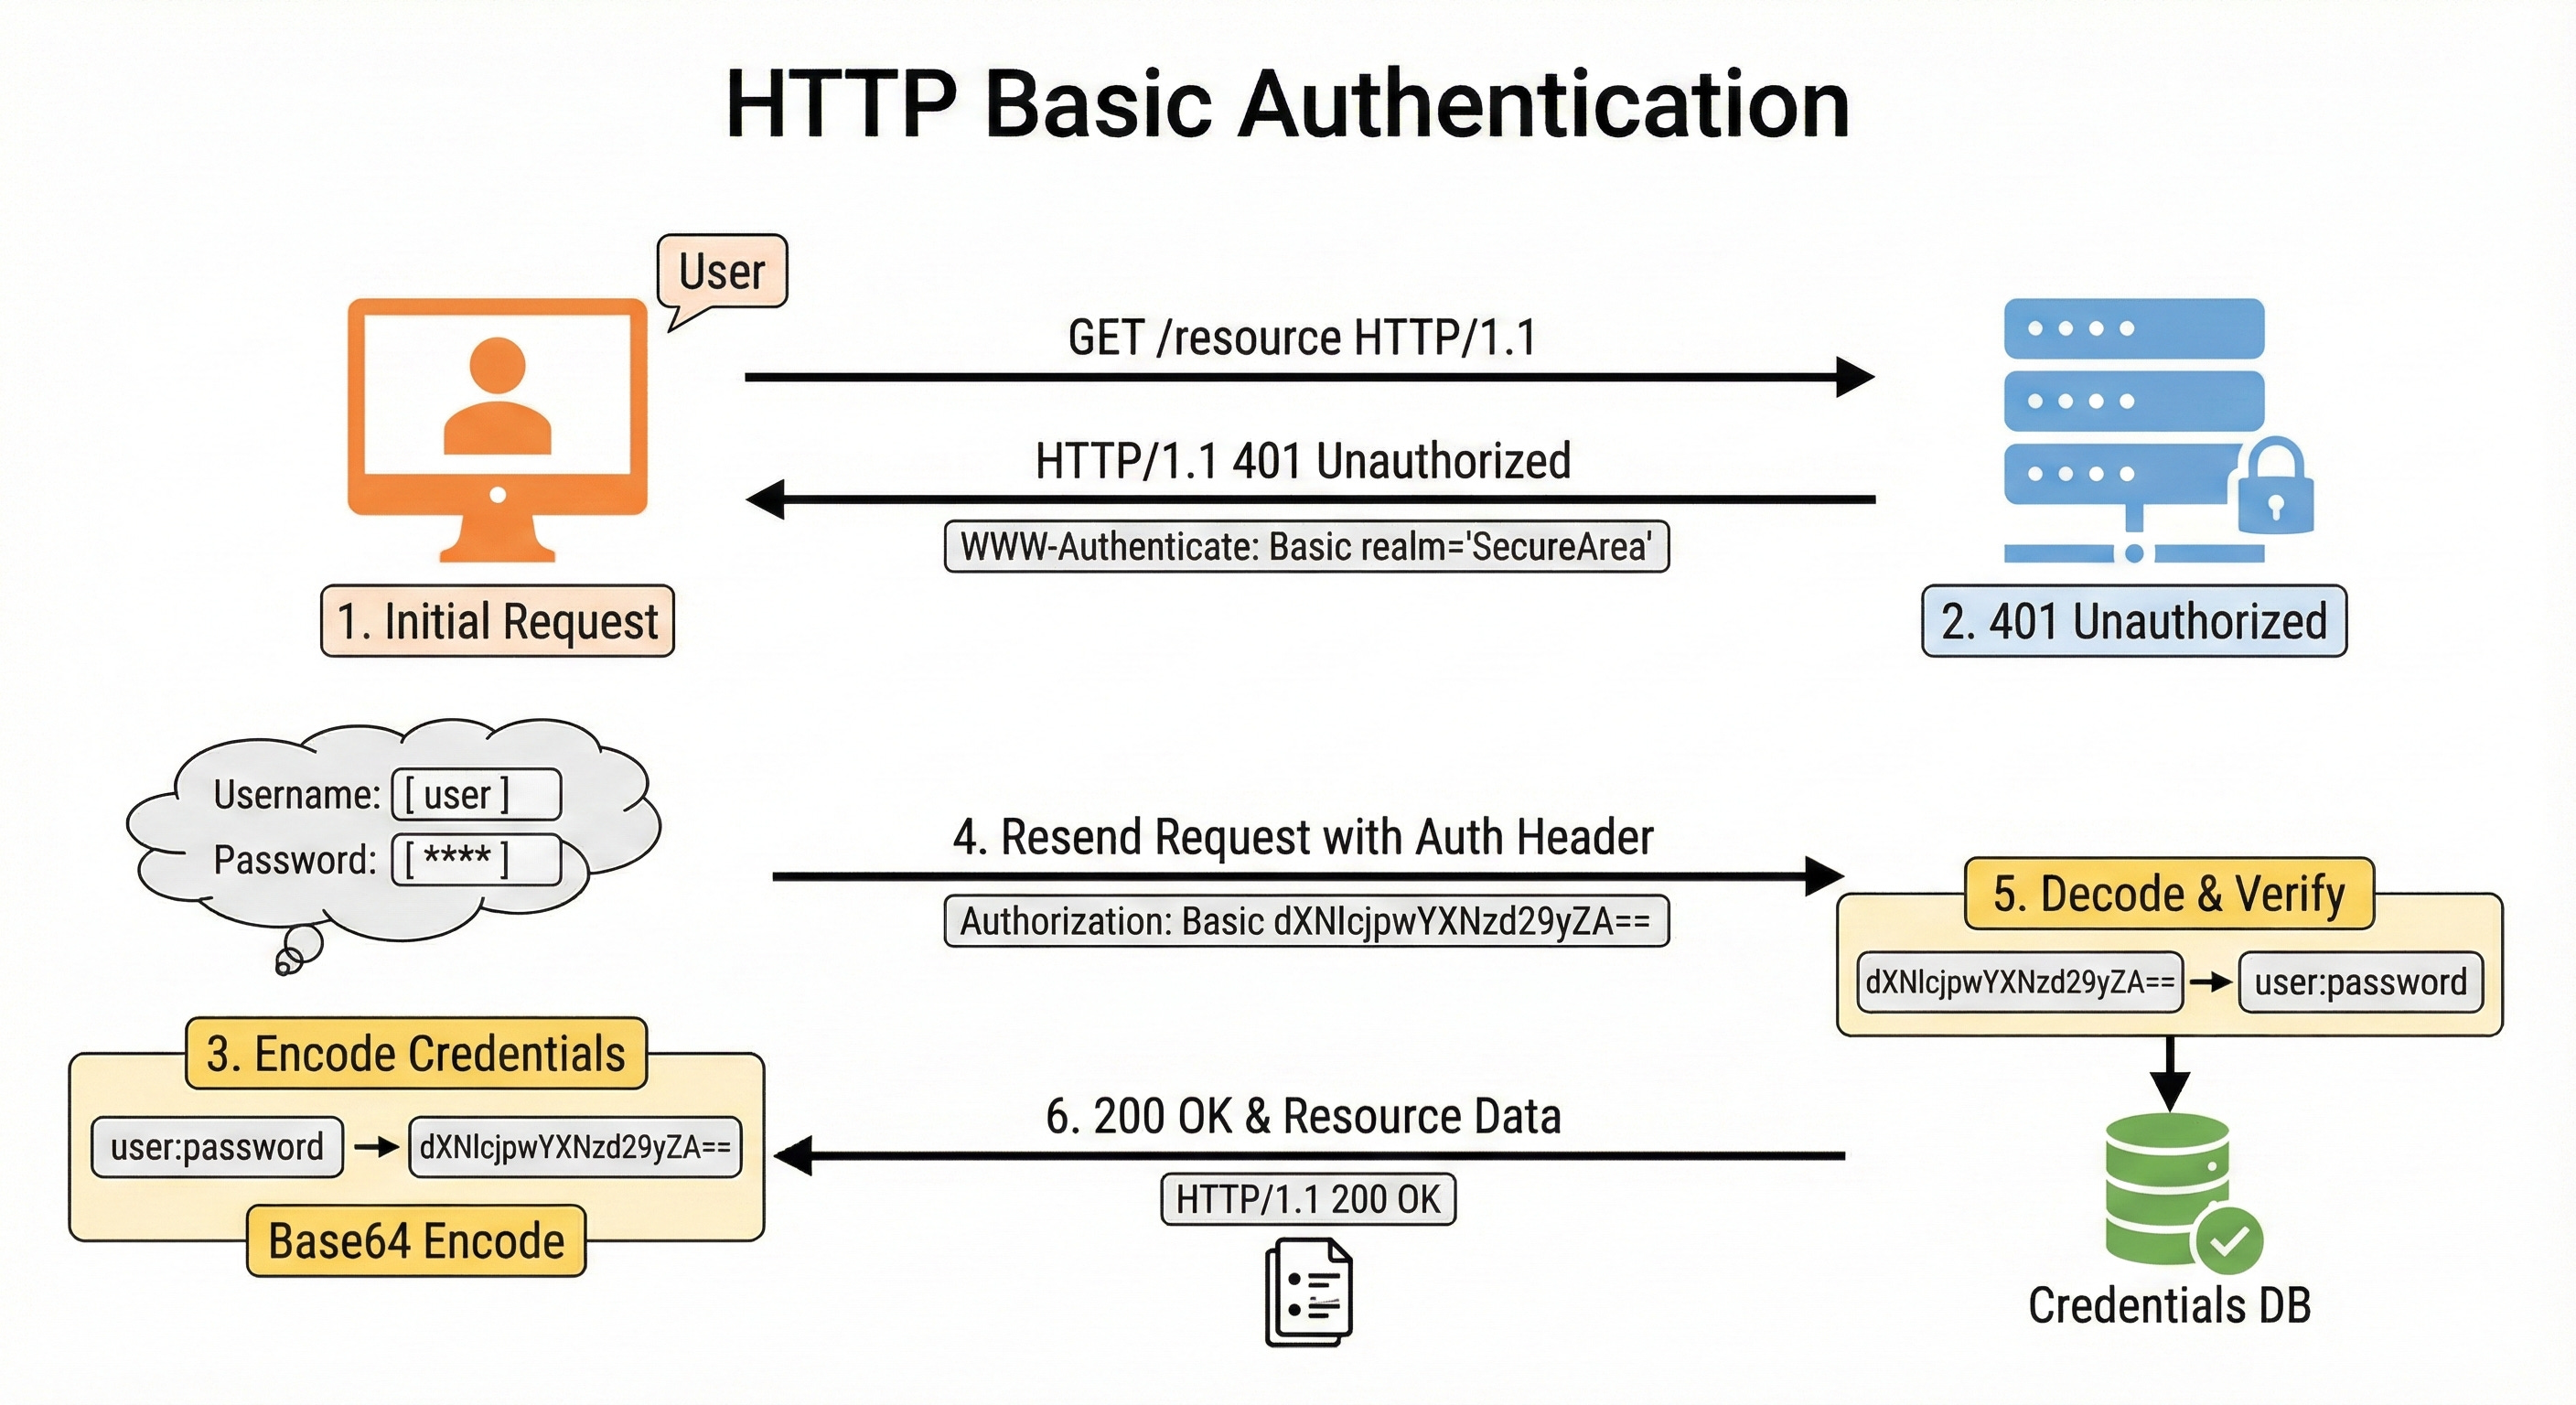
How It Works
When you want to access a protected resource, your browser (or API client) takes your username and your password and joins them together with a colon.
username:password
Then, it applies a process called Base64 Encoding to this string. This turns it into a long string of random-looking characters.
If your username is aladdin and your password is open sesame, the combined string is aladdin:open sesame.
When encoded, it looks like this: YWxhZGRpbjpvcGVuIHNlc2FtZQ==
Your browser puts this string into a special header called Authorization and sends it to the server.
Authorization: Basic YWxhZGRpbjpvcGVuIHNlc2FtZQ==
The server receives this header, decodes the Base64 string back into the username and password, checks them against the database, and if they match, it sends you the data.
The Dangerous Misconception: Base64 is NOT Encryption
This is the most critical thing you need to learn about Basic Auth.
Base64 is not encryption.
Many junior developers see that scrambled string of characters (YWxhZGRpb...) and think “Oh, my password is safe because it is scrambled.”
This is false.
Base64 is an encoding scheme. It is just a different way of writing the same data, like translating “Hello” into Morse Code.
Anyone who intercepts that string can decode it instantly without needing a key or a password.
If you send Basic Auth headers over a standard HTTP connection (not HTTPS), anyone on the coffee shop Wi-Fi can see your header, reverse the Base64, and steal your password in plain text.
Therefore, you must never use Basic Auth without HTTPS.
The security of Basic Auth relies entirely on the secure tunnel (TLS/SSL) created by HTTPS to hide the header from prying eyes.
When to Use Basic Auth
You might be thinking that if it requires sending the password every time, and it is not encrypted by itself, we should never use it.
That is not entirely true. It has a niche.
Use Basic Auth when:
You are building a simple internal script or tool that runs on a private, secure network.
You are testing an API quickly and do not want to set up a complex login system.
You are connecting two servers that trust each other over a secure channel.
You need a quick and dirty way to protect a prototype site from public crawling.
Avoid Basic Auth when:
You are building a user-facing application (web or mobile).
You need users to be able to log out (since the browser caches the credentials, logging out is surprisingly hard).
You are on an insecure network.
2. Session-Based Authentication
As the web grew up, sending passwords with every request became a bad idea.
It was insecure and inefficient. We needed a way to log in once and stay logged in.
This led to the invention of Session-Based Authentication.
Think about how a hotel works.
When you arrive, you go to the reception desk. This is the “Login” step.
Check-In: You give the receptionist your ID and credit card (Credentials).
Verification: The receptionist checks their computer to see if you have a reservation (Database lookup).
Session Creation: If everything checks out, the hotel creates a record that you are currently a guest.
The Token: The receptionist gives you a plastic Key Card.
This Key Card is your Session ID.
Here is the important part: The Key Card usually does not have your name or address printed on it. It just has a magnetic strip with a random code.
If you lose the card, no one knows who you are just by looking at it.
When you want to go to the pool or the gym (Protected Resources), you tap your card. The reader checks the code against the hotel’s system.
“Is key card #12345 active? Yes? Okay, let them in.”.
How It Works Under the Hood
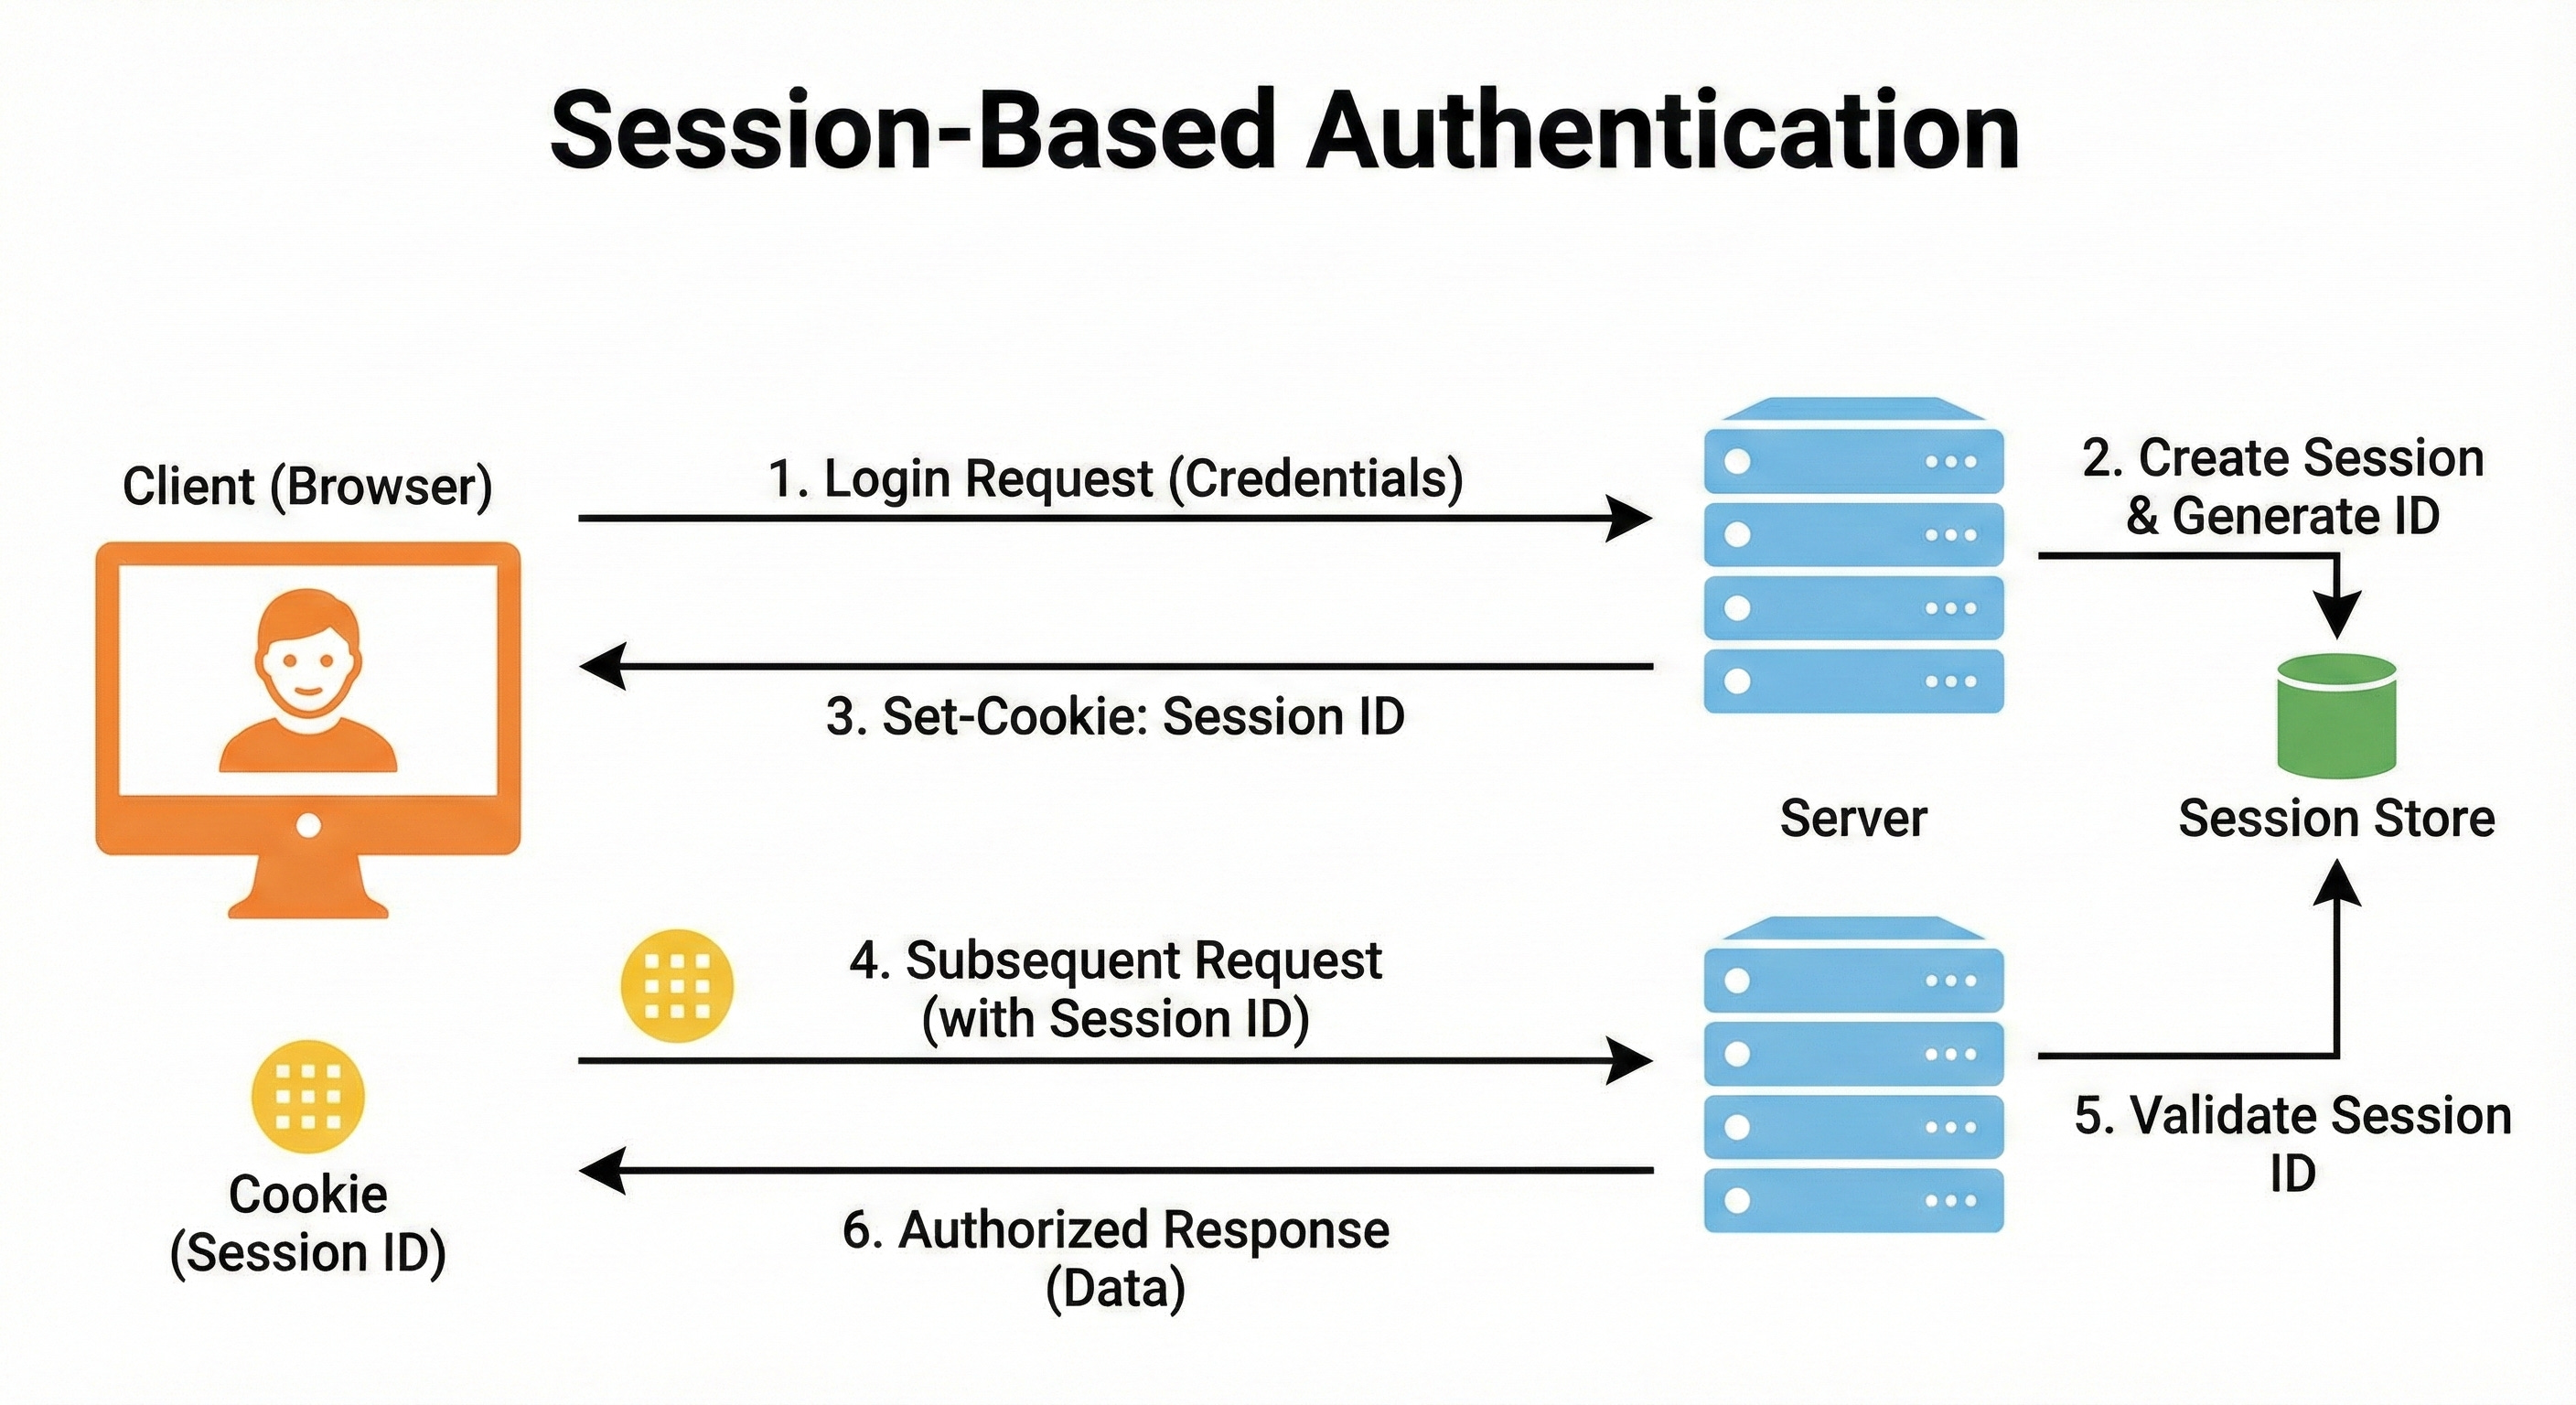
Login: The user sends their username and password to the server once.
Session Creation: The server verifies the credentials. If valid, it creates a “Session” record in its memory or database. This record contains the user’s ID, role, and login time.
Cookie: The server generates a unique Session ID (a long random string) and sends it back to the browser in a Cookie.
Automatic Transport: Browsers are programmed to automatically send cookies back to the server they came from. So, for every subsequent request, the browser silently attaches the Cookie with the Session ID.
Lookup: The server receives the ID, looks it up in its memory, finds the associated user, and grants access.
The Problem: Scaling the Hotel
This system works beautifully for monolithic applications.
A “monolith” is where your entire app lives on one server.
The hotel analogy holds up because there is only one reception desk and one system.
But what happens when your app becomes popular?
You have millions of users.
One server is not enough.
You add a second server, then a third.
Now you have a Distributed System.
Imagine the hotel expands. It now has three buildings (Server A, Server B, Server C).
You check in at Building A.
The receptionist in Building A writes your name in their logbook and gives you a key.
Later, you try to enter the gym in Building B.
You tap your card.
The system in Building B looks at its logbook. It says, “I have no record of key #12345.” It denies you access.
This is the Statefulness problem.
In a session-based system, the server needs to remember you.
If you have multiple servers, they do not share memory.
You logged into Server A, but Server B does not know you.
To fix this, you have two expensive options:
Sticky Sessions: You force the load balancer to always send Alice to Server A. If Server A crashes, Alice is logged out.
Distributed Cache (Redis): You buy a separate, super-fast database (like Redis) just to hold the session records. All servers check this central database. This works, but it adds complexity and cost.
For modern applications with microservices, we needed a way to verify users without checking a central database every time.
We needed a stateless solution.
3. Bearer Authentication & Tokens
To solve the scaling problem, we moved away from Sessions and toward Tokens. This is where Bearer Authentication comes in.
The term “Bearer” explains exactly how it works. It means: “Give access to the bearer of this token.”
Think of it like a cash banknote.
If you find a $20 bill on the ground, you can spend it.
The shopkeeper does not ask for your ID. They do not check a central bank database to see if that specific bill belongs to you. They just trust the bill itself because it looks real and has the right watermarks.
You are the “Bearer” of the cash, so you have the value.
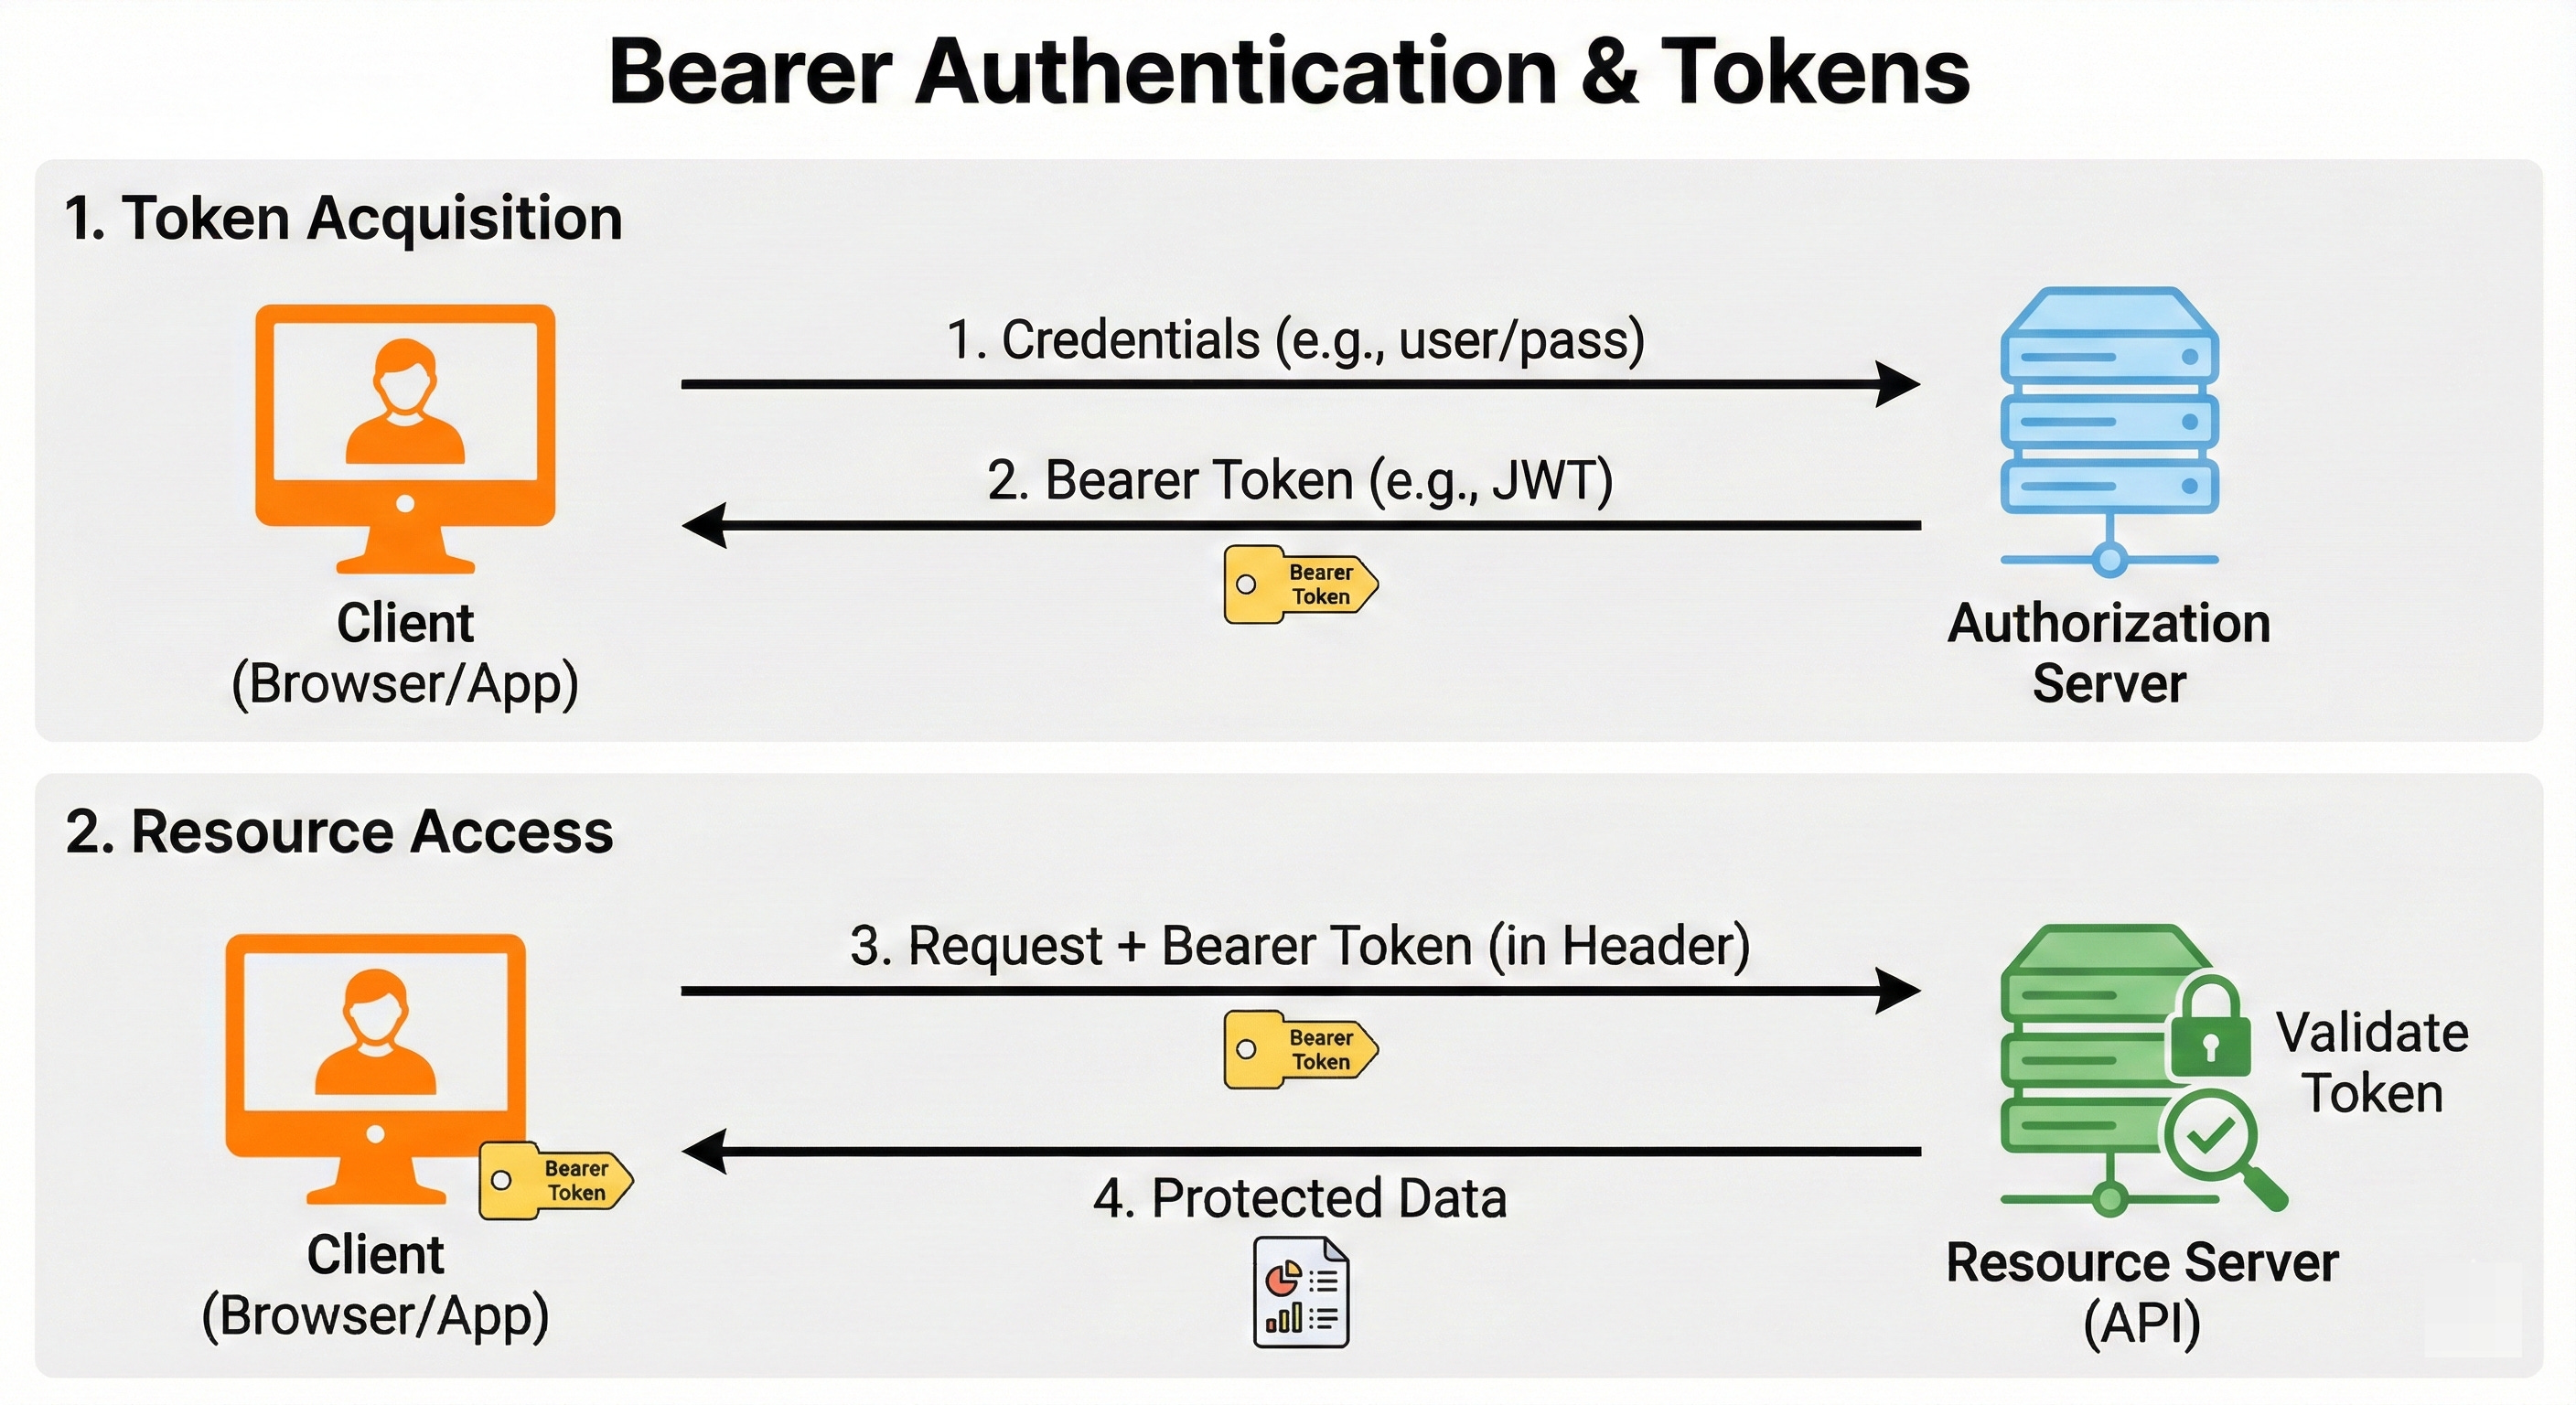
In this model, the server issues a token to the client.
The client stores it.
When the client wants data, it sends the token in the header:
Authorization: Bearer <token_string>
The server looks at the token.
If the token is valid, access is granted. The server does not necessarily need to look up who the token belongs to in a database if the token is designed correctly.
This brings us to the most popular type of Bearer token used today: the JWT.
4. JWT (JSON Web Tokens)
JWT (pronounced “jot”) stands for JSON Web Token. It is the industry standard for stateless authentication in modern web apps, mobile apps, and microservices.
Example: The Passport
If Session Auth is a Hotel Key Card, JWT Auth is a Passport.
Think about your passport.
Data: It contains your data directly on the page: Name, Date of Birth, Nationality, Passport Number.
Signature: It has a holographic seal and special printing from the government.
Trust: When you fly into a foreign country, the immigration officer does not call your home government’s database to check if you are real. That would be too slow. Instead, they examine the passport itself. They check the hologram. They check the machine-readable zone. If the signature (hologram) is valid, they trust the data (your name) written on the page.
The passport is self-contained. It carries the data with it.
This is exactly how a JWT works.
The Anatomy of a JWT
A JWT is just a long string of characters, but it is actually three parts separated by dots (.).
It looks like this: aaaaa.bbbbb.ccccc
The Header (Red): This part describes how the token was made. It usually says “I am a JWT and I was signed using the HS256 algorithm.”
The Payload (Purple): This is the body of the passport. It contains the Claims. Claims are just bits of data.
Subject (
sub): Usually the User ID (e.g.,user_123).Expiration (
exp): When this token stops working.Custom Data: You can put anything here, like
role: “admin”oremail: “alice@example.com”.
The Signature (Blue): This is the security seal. The server takes the Header and the Payload, combines them with a Secret Key (that only the server knows), and uses math to generate a signature.
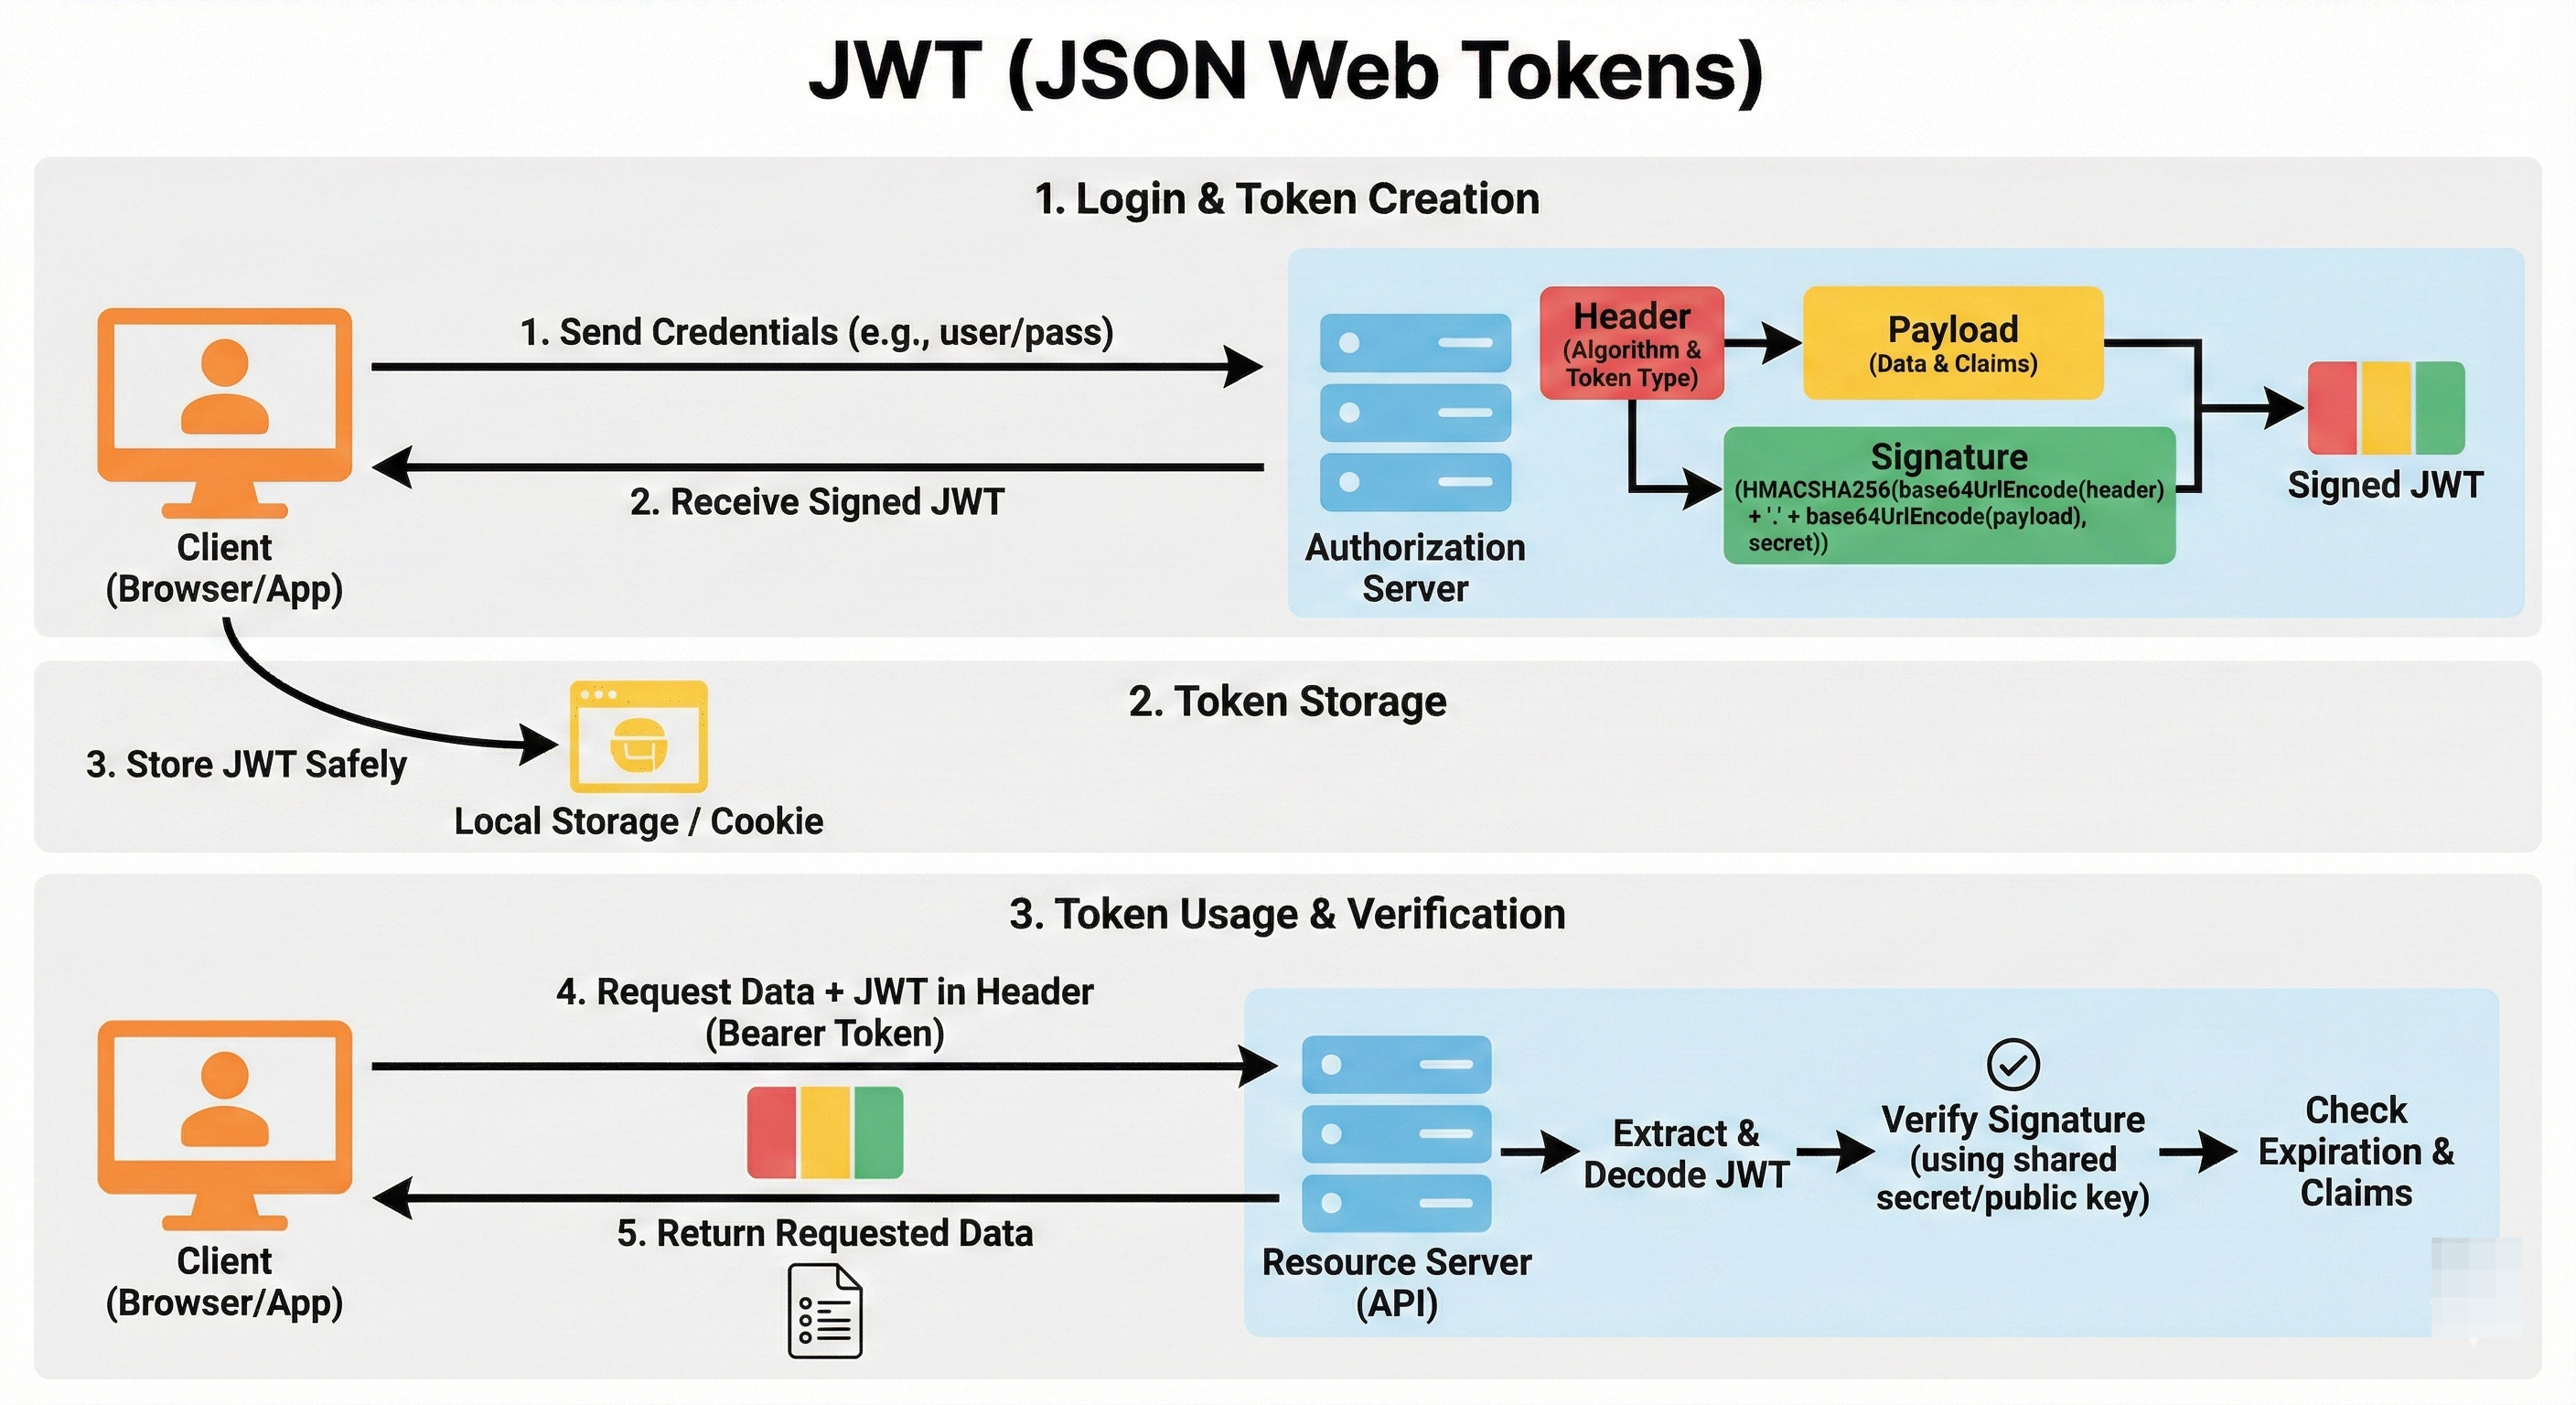
How It Solves the Scaling Problem
When a user logs in, Server A generates a JWT. It puts user_id: 123 and role: admin into the payload. It signs it with the Secret Key.
Later, the user sends this JWT to Server B.
Server B has the same Secret Key.
It takes the JWT, runs the math again, and checks the signature.
If the signature matches, Server B knows:
This token was created by us (because only we have the Secret Key).
The data inside has not been tampered with.
Server B can now safely trust that the user is user_123 and is an admin without ever checking a database.
It does not need to ask Server A.
It does not need to check Redis.
It just reads the token.
This makes JWTs incredibly fast and scalable for microservices.
The Big Warning: Decoding vs. Verifying
Here is a trap for junior developers.
JWTs are Encoded, not Encrypted.
Just like Basic Auth, the payload of a JWT is Base64 encoded.
Anyone can copy your JWT, paste it into a debugger like jwt.io, and read the payload.
They can see the User ID. They can see the email.
Never put sensitive secrets in a JWT payload.
Do not put passwords, social security numbers, or credit card info in there.
The user (and anyone who steals the token) can read it.
The Signature only prevents them from changing it, not from reading it.
The “Logout” Problem
JWTs have one major weakness compared to Sessions. You cannot easily revoke them.
With a Hotel Key Card (Session), if a guest misbehaves, the hotel can just deactivate the key in the computer.
The guest is locked out instantly.
With a Passport (JWT), once it is issued, it is valid until it expires.
You cannot remotely change the printing on a physical passport that is in someone else’s pocket.
If a hacker steals a user’s JWT, they can impersonate that user until the token expires.
The server has no way to say “Cancel this specific token” because the server is stateless. It is not tracking tokens.
How to fix this:
Short Lifespans: We make the JWT expire very quickly (e.g., 5 to 15 minutes). If it is stolen, the thief only has a 5-minute window.
Refresh Tokens: We give the user two tokens. A short-lived Access Token (JWT) and a long-lived Refresh Token. When the Access Token expires, the app uses the Refresh Token to ask for a new one. The Refresh Token is stored in a database, so we can revoke that one if needed.
5. OAuth 2.0
So far, we have talked about logging into your app.
But what if you want to let a user log in using their Google account?
Or what if you want your app to be able to post to a user’s LinkedIn profile?
You could ask the user for their Google password, log in as them, and do the work.
Do not do this.
This is a terrible idea.
If you store their Google password and you get hacked, everyone’s Google account is compromised.
Plus, users should never trust your app with their main Google password.
We need a way to get Delegated Access.
We need permission to do some things on the user’s behalf without taking over their whole identity.
This is OAuth 2.0.
Example: The Valet Key
Many luxury cars have a special key called a Valet Key.
The Master Key (Password) opens the doors, starts the engine, opens the trunk, and unlocks the glovebox.
The Valet Key (OAuth Token) only opens the door and starts the engine. It does not open the trunk or glovebox.
When you go to a fancy restaurant, you give the valet the Valet Key.
You are delegating access.
You are saying, “I authorize you to drive my car, but I do not authorize you to steal my sunglasses from the glovebox.”.
The Roles in OAuth
OAuth introduces a cast of characters :
The Resource Owner: That is You (the user). You own your data (your photos, your contacts).
The Client: That is the App you are trying to use (e.g., a photo printing website).
The Authorization Server: That is the Security Guard (e.g., Google or Facebook). They hold the keys.
The Resource Server: That is the Vault where the data lives (e.g., the Google Photos API).
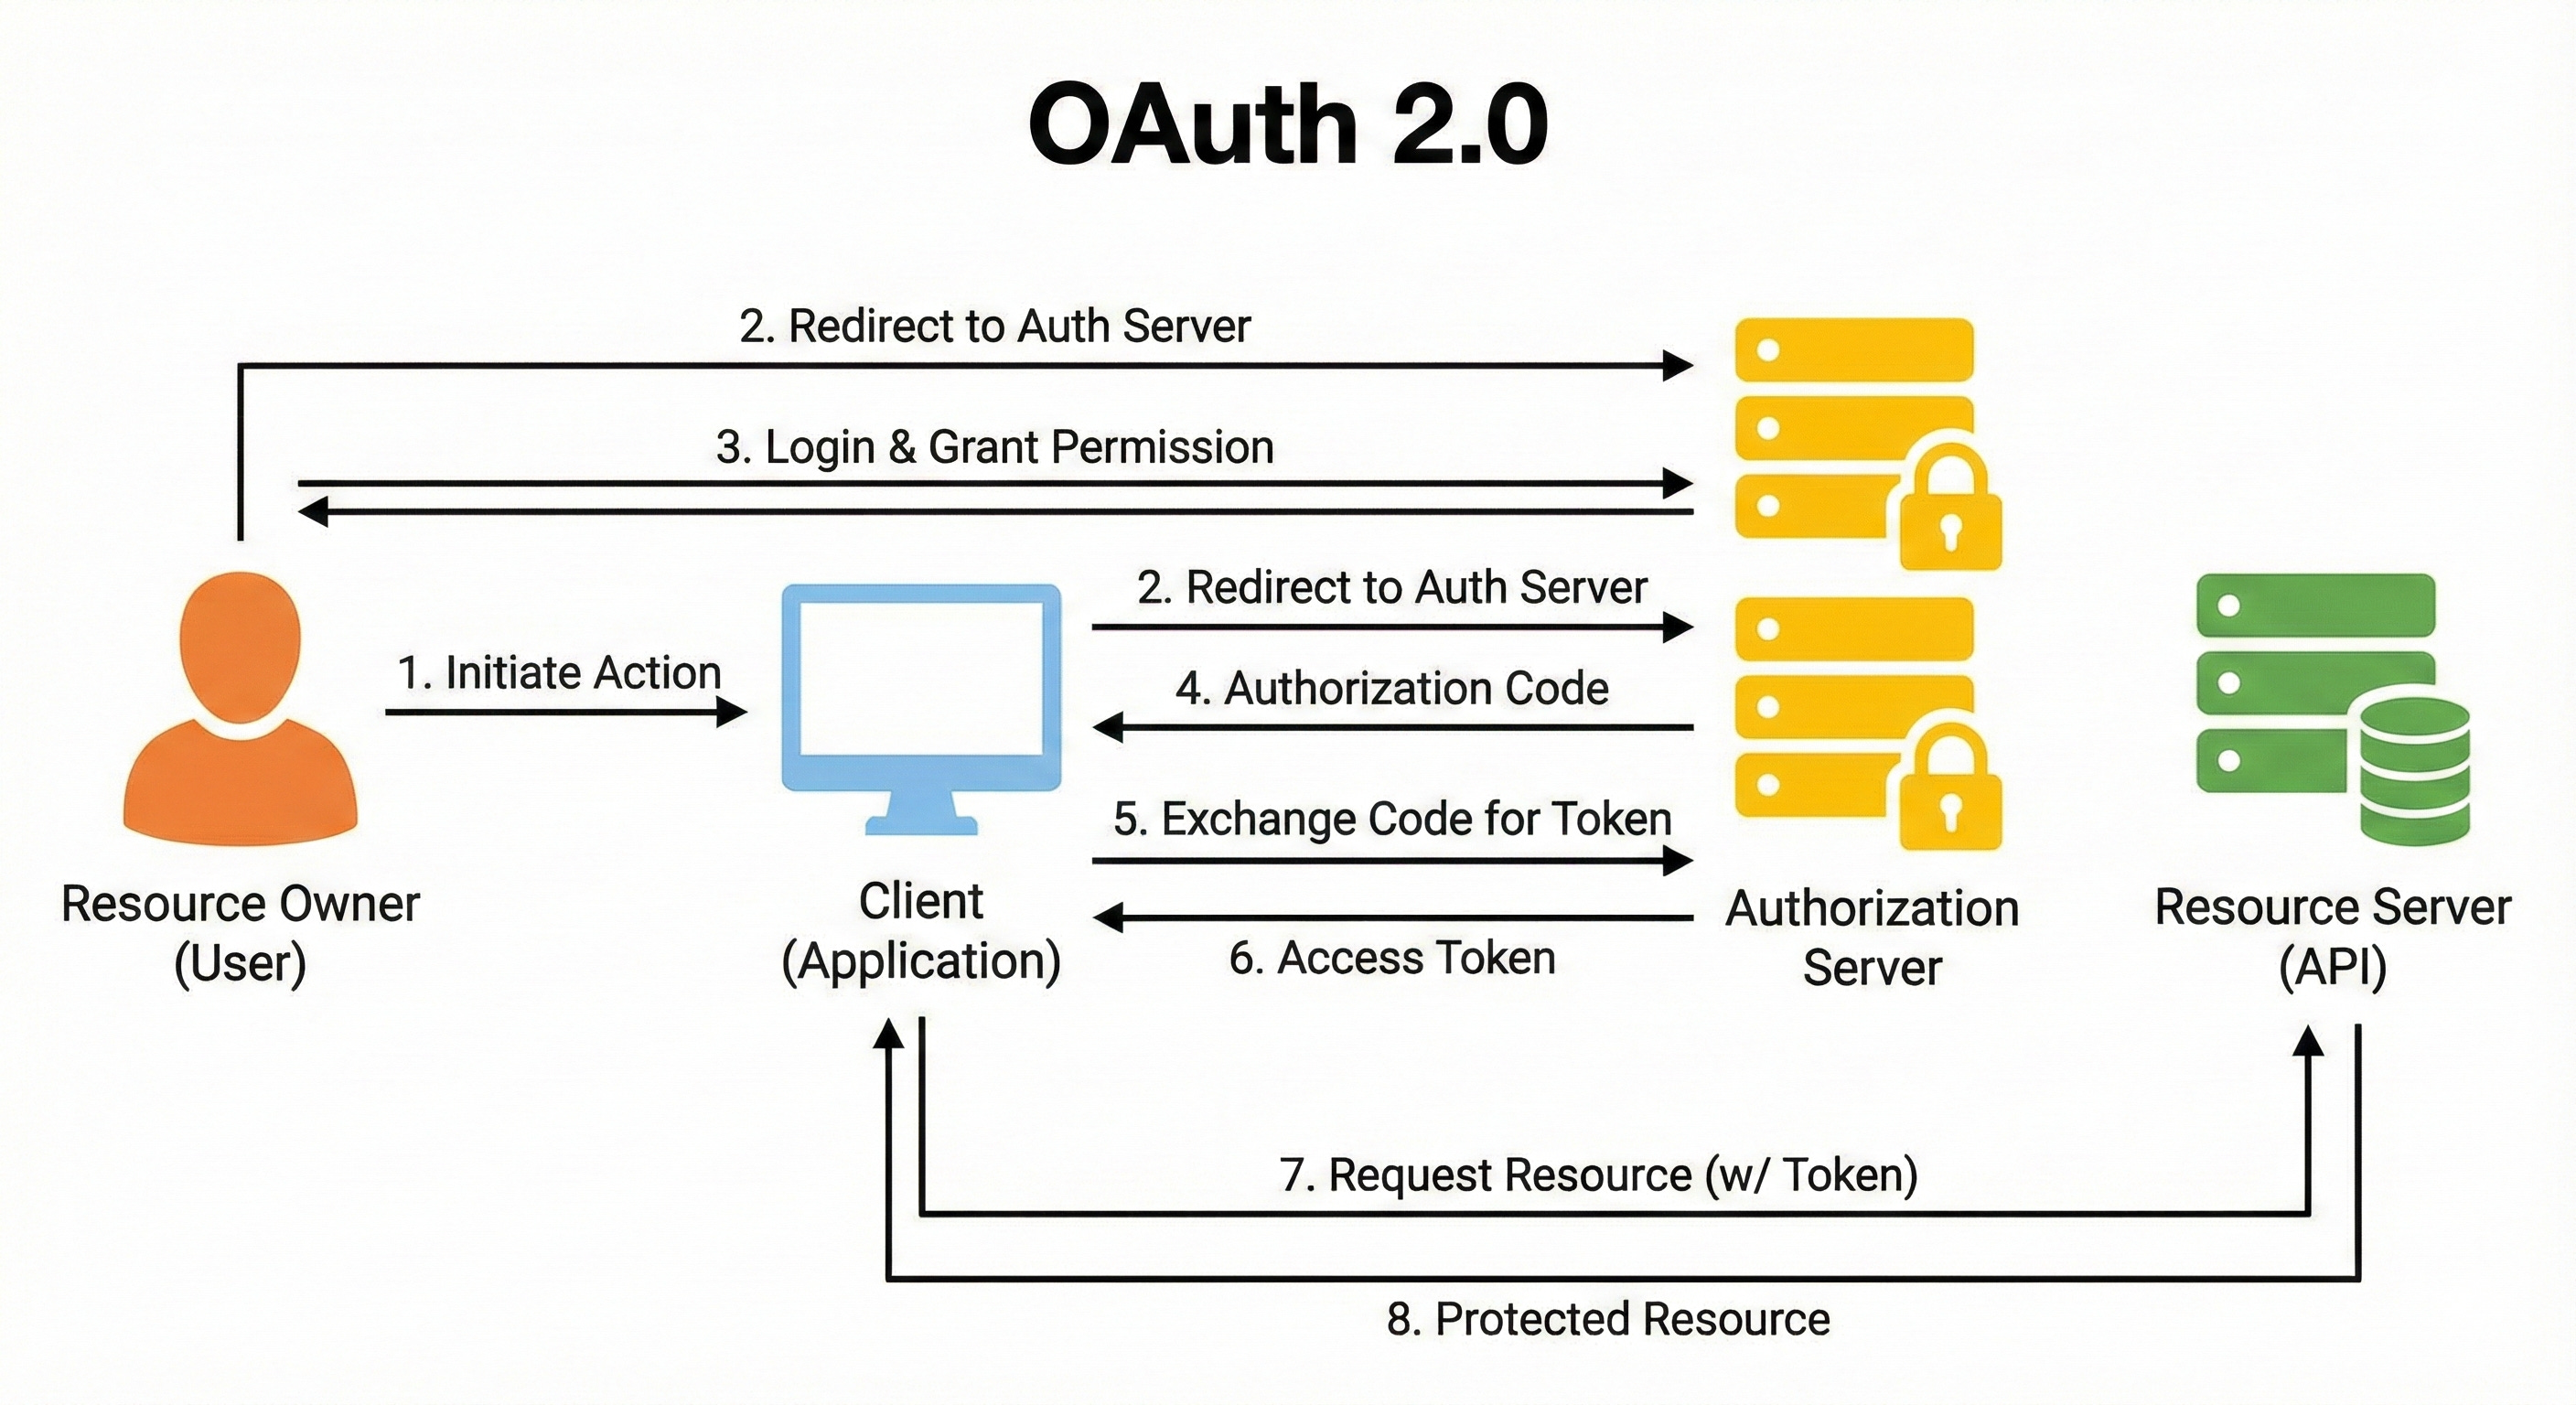
Authorization Code Flow
When you click “Connect with Google,” the following things happen:
Redirect: The app redirects you to Google. “Hey Google, this user wants to let me access their photos.”
Login & Consent: You see a screen on Google.com. It asks, “Do you want to allow ‘PhotoPrinterApp’ to access your Photos?” This is the Scope. You are deciding how much power the Valet Key has.
The Code: You click “Yes.” Google does not send a token to the app yet (that would be unsafe to send to a browser). Google redirects you back to the app with a temporary, one-time code in the URL.
The Exchange: The app’s server sees this code. It talks to Google’s server directly (server-to-server). It says, “I have this code from Alice, and here is my own secret ID. Can I have the token?”
The Token: Google verifies the code and the app’s secret. Then it hands over the Access Token (the Valet Key).
Now the app can show Google that token and get your photos, but it can’t read your emails or change your password.
When to use OAuth 2.0:
You want users to grant your app access to their data on another service (Google, Facebook, GitHub).
You have a complex system where different parts need different levels of permission (Scopes).
You are building a public API for other developers to use.
6. Single Sign-On (SSO) & OpenID Connect (OIDC)
We have covered logging in directly (Basic/Sessions/JWT) and delegated access (OAuth).
The final piece of the puzzle is Single Sign-On (SSO).
In a large company, you might use Slack, Zoom, Jira, and Salesforce.
It would be annoying to have four different usernames and passwords. It would be a nightmare for IT to manage.
If you leave the company, they would have to delete your account in four different places.
SSO solves this.
You log in once, and you get access to everything.
Example: The Festival Wristband
Think of a music festival or a club with multiple VIP areas.
The ID Check: You arrive at the main gate. You show your ID to the security staff. This is the Identity Provider (IdP) (like Okta or Google).
The Wristband: Once they verify you, they put a wristband on your arm.
The Tents: You walk into the “Jira Tent.” The bouncer there does not ask for your ID. They just look at your wristband. “Oh, you have a wristband from the main gate? Come on in.” You go to the “Slack Tent.” Same thing.
The wristband is trusted by all the tents because they trust the main gate security.
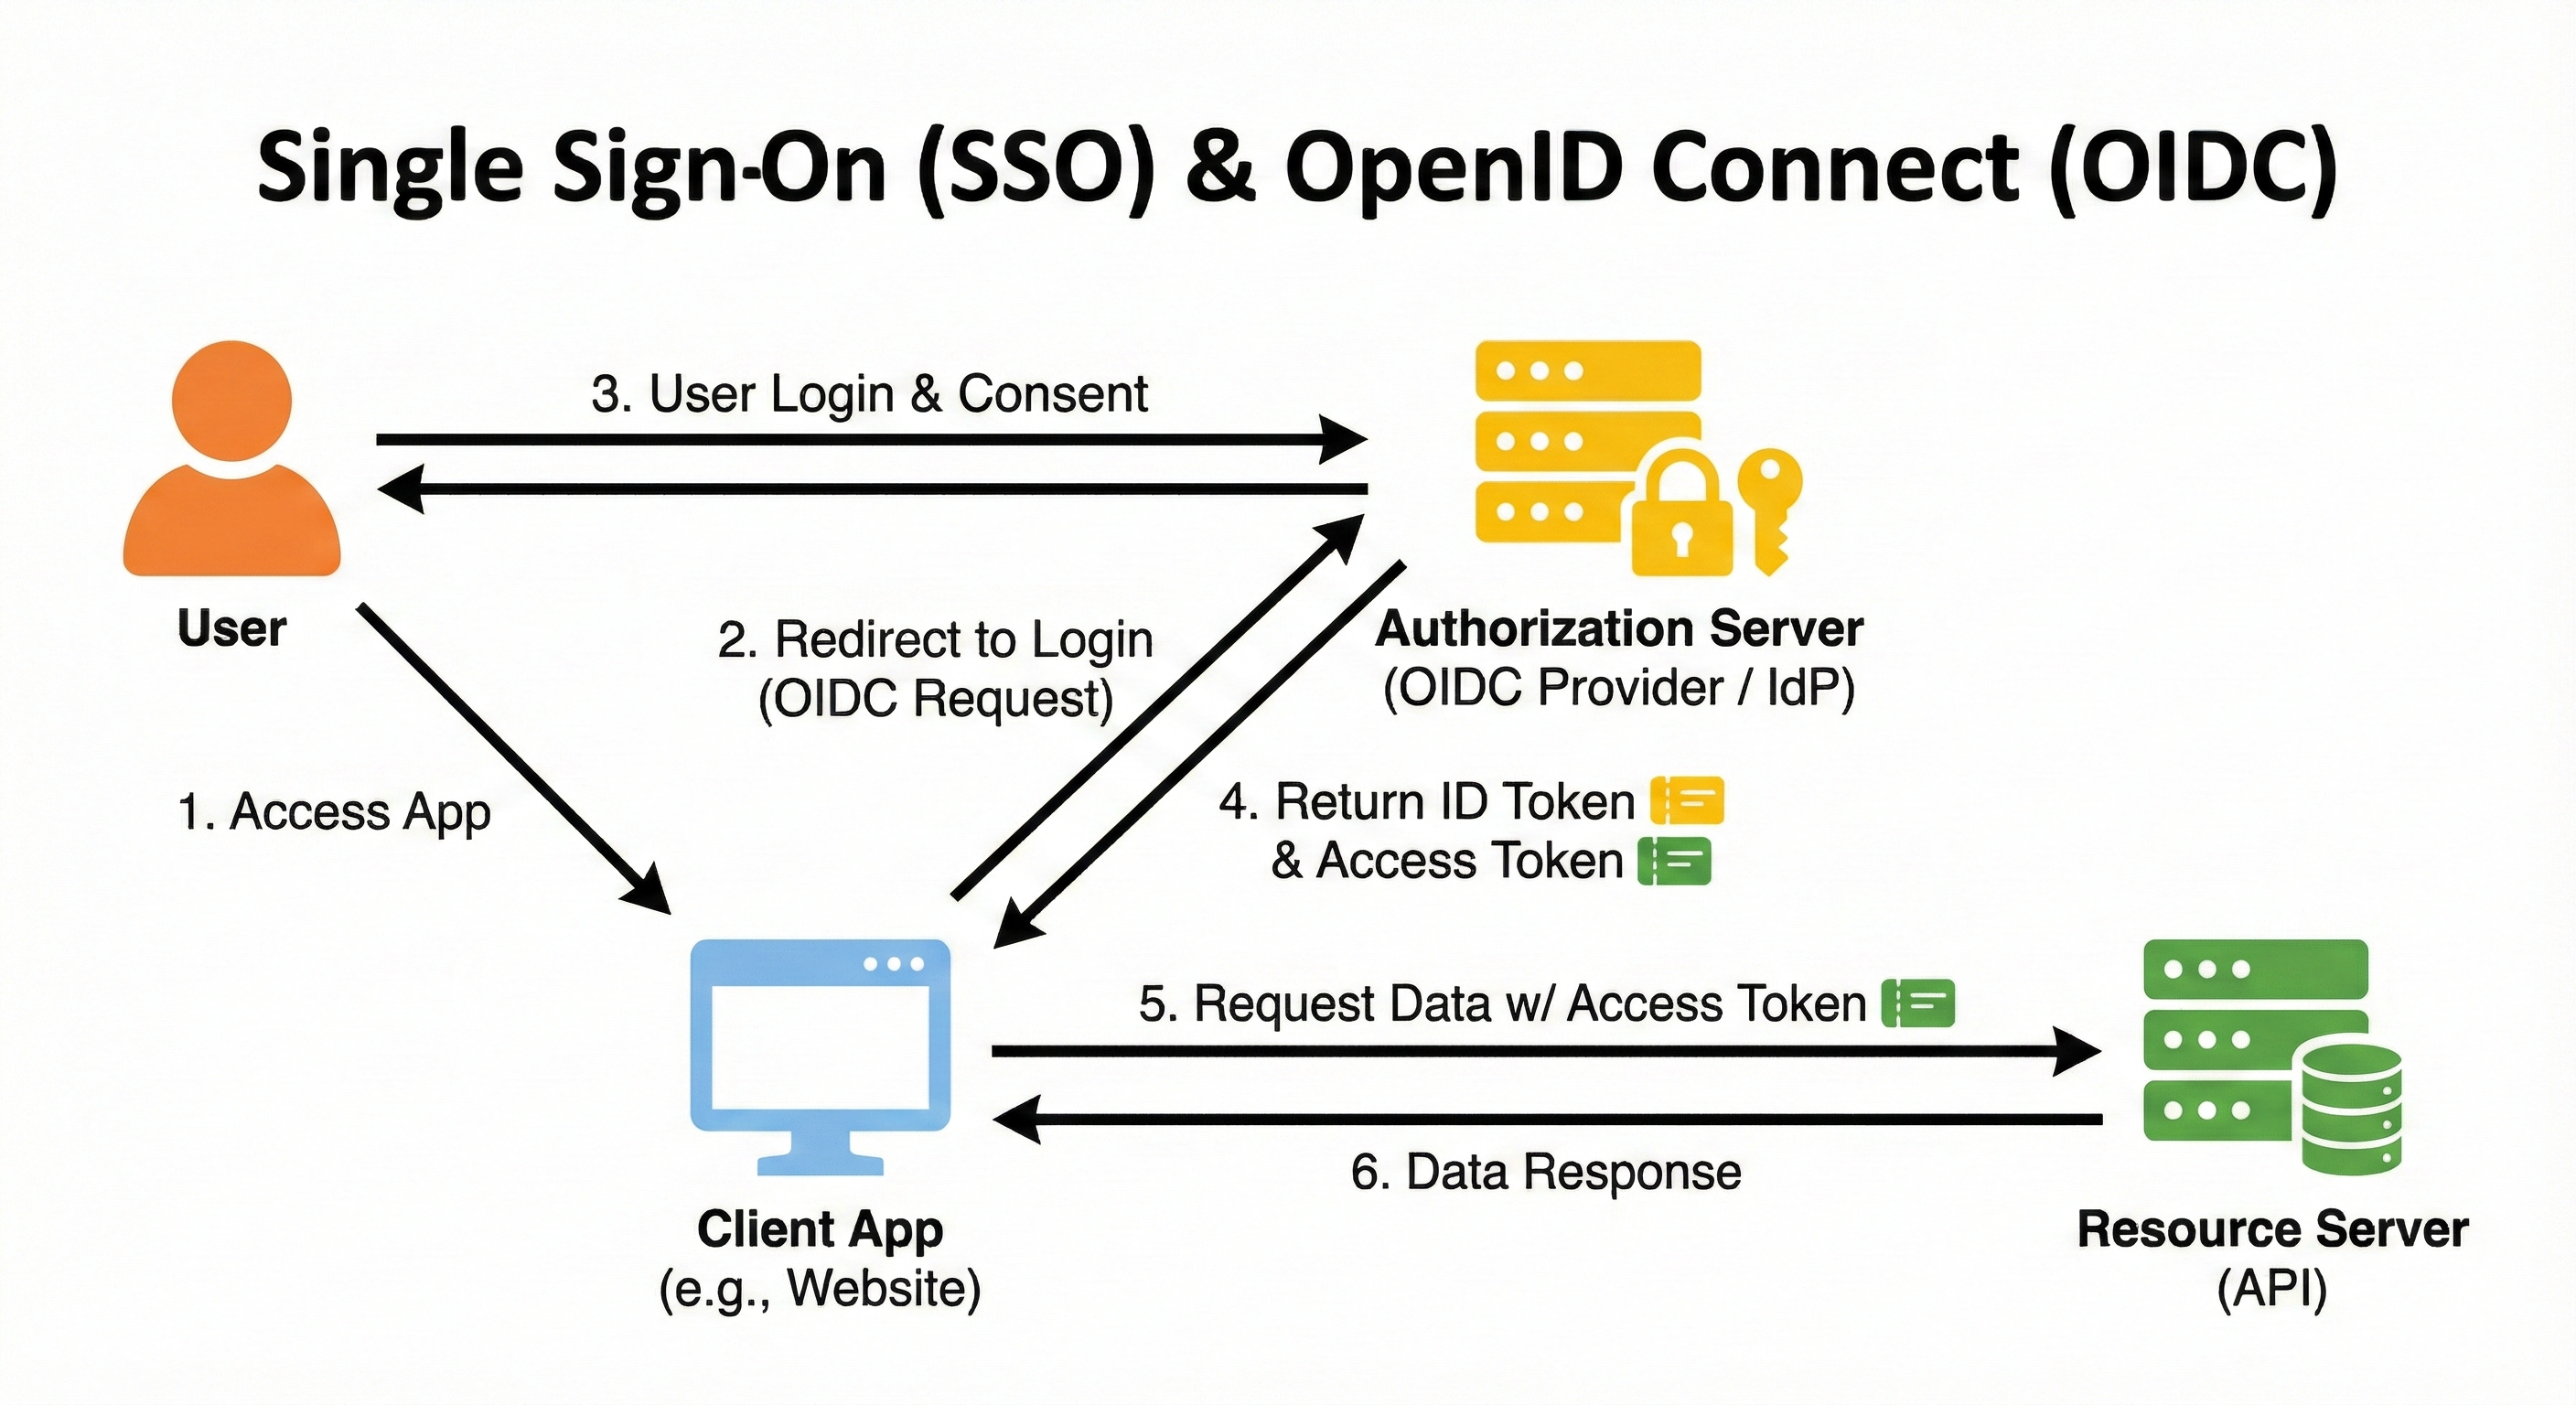
Enter OpenID Connect (OIDC)
Here is a messy bit of history.
OAuth 2.0 was designed for Authorization (accessing resources), not Authentication (logging in).
But developers started hacking OAuth to use it for login (”Sign in with Facebook”). This was often insecure.
So, a group of smart engineers built a layer on top of OAuth 2.0 specifically for identity. This is OpenID Connect (OIDC).
OIDC adds a new type of token to the OAuth flow: the ID Token.
Access Token: The Valet Key (What can I do?).
ID Token: The Badge (Who am I?).
The ID Token is a JWT that contains information about the user (Name, Email, Photo). It allows the client app to know who the user is in a standardized way.
When to use SSO/OIDC:
You are building an app for a company that uses an IdP (like Okta, Azure AD, or Auth0).
You want to add “Log in with Google” or “Log in with Apple” to your app.
You have multiple apps in your ecosystem and want a unified login experience.
Making the Decision: A Cheat Sheet for Junior Developers
We have covered a lot of ground. You might still be looking at that ticket in your backlog wondering, “Okay, but which one do I use?”
Here is a simplified decision tree to help you choose.
Scenario 1: You are building a simple script to run on your laptop that talks to a server on your own private network.
Use: Basic Auth (over HTTPS). It is fast and easy to implement.
Scenario 2: You are building a classic web app (like a Django or Rails app) that renders HTML on the server.
Use: Session Auth. It is secure, battle-tested, and frameworks support it out of the box. You do not need the complexity of tokens.
Scenario 3: You are building a Single Page App (React/Vue) with a separate backend API, or a Mobile App.
Use: JWT (Bearer Auth). This allows your API to be stateless and scale easily. Just remember to handle token storage securely (HttpOnly cookies are best for web).
Scenario 4: You want your users to be able to log in with their existing Google or GitHub accounts.
Use: OAuth 2.0 + OIDC. Do not roll your own crypto. Use a library like
Passport.jsor a service like Auth0/Firebase.
Scenario 5: You are building a system for a large enterprise where employees need access to many different internal tools.
Use: SSO (SAML or OIDC). This is mandatory for corporate security compliance.
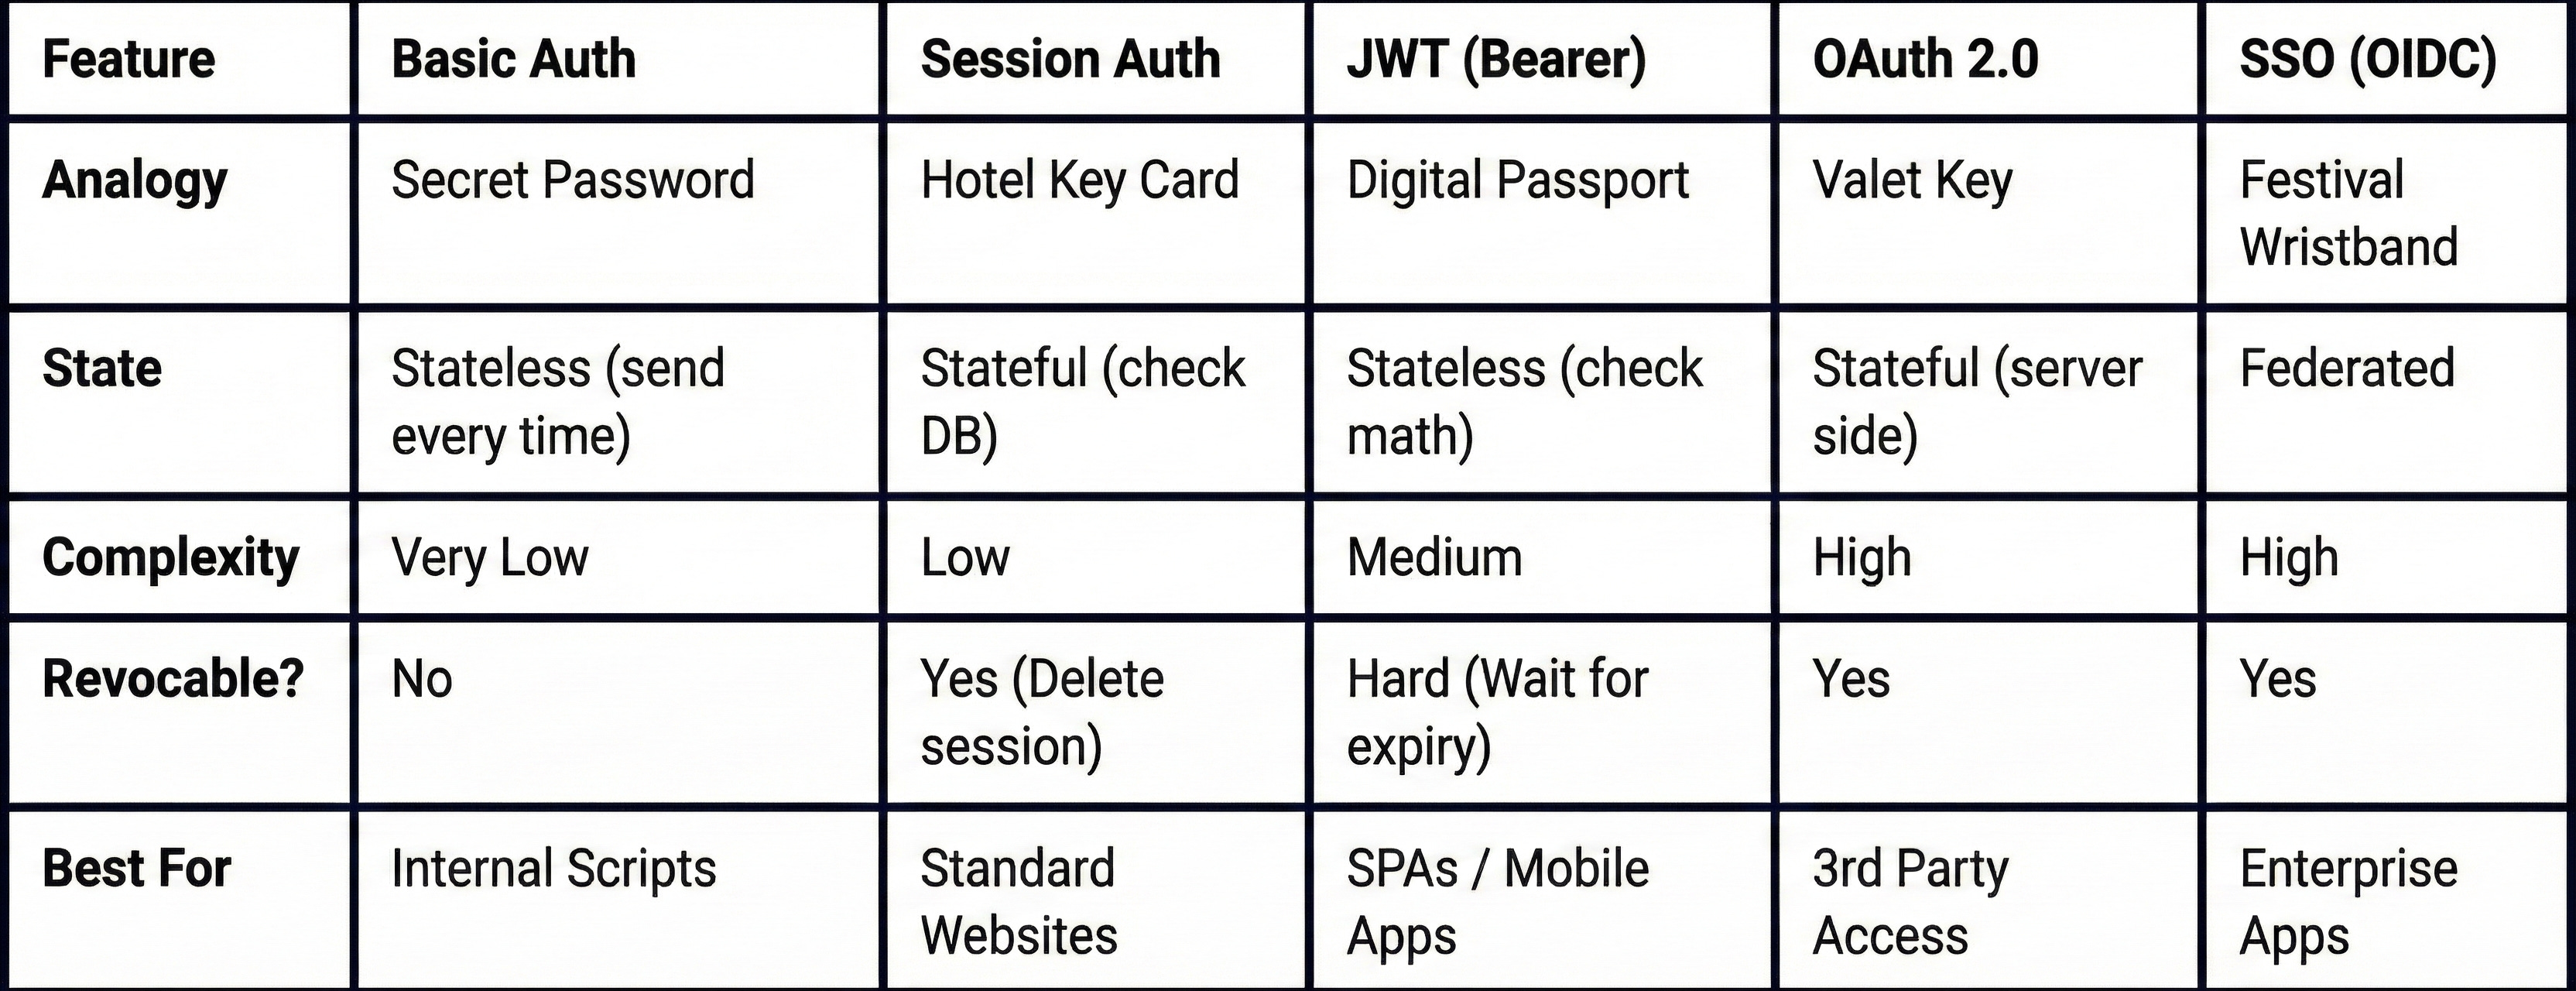
Comparison Table
Conclusion
Authentication feels overwhelming because it tries to solve a massive problem: Trust.
How do we trust strangers over the internet?
Basic Auth trusts the secret code you whisper.
Sessions trust the temporary key card the hotel gave you.
JWTs trust the holographic signature on the document you carry.
OAuth trusts the permission you gave to a helper.
SSO trusts the security guard at the front gate.
As a junior developer, you do not need to memorize every line of the RFC specifications.
You just need to understand the trade-offs.
Security is not a feature. It is the foundation.
HTTPS is mandatory. None of these methods are safe without it.
Don’t reinvent the wheel. Use established libraries. Do not try to write your own JWT signing function or your own OAuth handler from scratch. You will make a mistake, and that mistake will be a vulnerability.
Next time you look at that login ticket, do not panic.
Look at your architecture.
Ask yourself: “Do I need a Hotel Key or a Passport?”
Once you answer that, the rest is just code.
Key Takeaways:
AuthN is who you are; AuthZ is what you can do.
Basic Auth is simple but sends passwords constantly; use only for internal tools.
Sessions are great for simple websites but struggle to scale across multiple servers.
JWTs are the standard for modern APIs because they are stateless, but they are harder to revoke.
Base64 is NOT encryption. Never hide secrets in a Base64 string or a JWT payload.
OAuth 2.0 is for delegated access (letting an app access your data).
OIDC is the layer on top of OAuth that handles user login (Identity).
An insightful piece that leverages strong analogies to make complex scenarios highly memorable; definitely a recommended read for senior developers looking to refresh their perspective or reinforce core concepts in a unique way.